Articulate Storyline sử dụng một cấu trúc phân cấp của các cảnh, của các slide, và các layer (lớp) để tổ chức nội dung. Các cảnh là những đơn vị tổ chức lớn nhất. Mỗi cảnh chứa một hoặc nhiều slide. Và mỗi slide có thể có nhiều layer (lớp)

Story View mang đến cho bạn một cái nhìn bằng hình ảnh lớn của toàn bộ dự án của bạn. Nó là nơi bạn quản lý các cảnh và bố cục của khóa học của bạn.
Chuyển chế độ Story View
Storyline ban đầu mở vởi chế độ Story View. Ở bất kỳ thời điểm nào, bạn có thể chuyển chế độ View bằng cách click vào nút Story View ở góc dưới bên phải của mành hình (gần thanh trượt Zoom).

hoặc, hãy nhấn vào thẻ View trên ribbon của Storyline và click Story View.
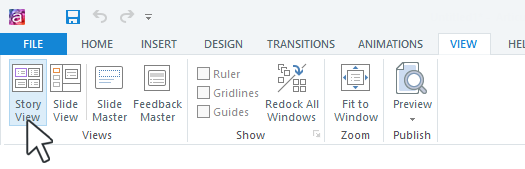
Nếu bạn đang trong chế độ Slide View, bạn cũng có thể click thẻ Story View ngay dươi Ribbon Storyline
Làm việc với các cảnh
Mỗi dự án của Storyline có ít nhất một cảnh. Story View là nơi bạn quản lý các cảnh, bao gồm thêm các cảnh, xóa cảnh và sắp xếp lại các slide xuất hiện trong các cảnh đó.
Thiết lập cảnh ban đầu:
Cảnh bắt đầu là cảnh đầu tiên mà người học nhìn thấy khi họ chạy khóa học của bạn. Trong Story View, cảnh bắt đầu có một lá cờ nhỏ màu đỏ bên cạnh tiêu đề của nó. Để chỉ định cảnh khác như là cảnh bắt đầu, làm một trong các cách sau:
- Chọn cảnh, hãy vào thẻ Home trên ribbon và nhấn Starting Scene.
- Phải chuột vào cảnh và chọn "Starting Scene".
Thêm cảnh:
Để thêm cảnh mới vào khóa học của bạn, làm một trong các cách sau đây:
- Vào thẻ Home và nhấn New Scene.
- Phải chuột vào bất cứ nơi nào trong không giang làm việc và chọn New Scene.
- Nhân bản một cảnh hiện tại (và tất cả các slide của nó) bằng cách chọn cảnh và ấn CTRL+D, hoặc phải chuột trên cảnh và chọn Duplicate.
Đổi tên cảnh:
Các tiêu đề xuất hiện ở đỉnh mỗi cảnh. Theo mặc định, tên là "untitled Scene", nhưng bạn có thể thay đổi nó bằng các cách sau::
- Nhấn đúp vào tiêu đề để mở nó cho sửa, gõ tên mới, và nhấn Enter từ bàn phím.
- Phải chuột vào cảnh và chọn Rename. Gõ tên mới và ấn Enter your keyboard.
Storyline hiện thị các tiêu đề của cảnh trong menu khóa học của bạn. Bạn có thể remove hoặc đổi tên tiêu đề cảnh trong thực đơn không ảnh hưởng đến slide cảnh trong Story View.
 Nếu bạn cần hướng dẫn tiếp email: dinhanhtuan68@gmail.com. Giờ bạn tham khảo tiếp nhé:
(Còn tiếp)

Deleting scenes:
To delete a scene (and all its slides) from your project, do either of the following:
- Select the scene and press Delete on your keyboard.
- Right-click the scene and choose Delete.
Collapsing and expanding scenes:
By default, Story View displays a thumbnail image for every slide in your course. If you have a large course with lots of slides, it can be helpful to collapse scenes to get a better picture of your course layout. To collapse a scene, click the triangle in the upper right corner of the scene. To collapse all scenes at once, right-click anywhere in the workspace and choose Collapse All Scenes.
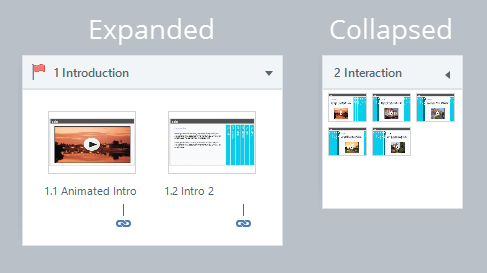
To expand a scene, click the triangle in the upper right corner of the scene. To expand all scenes at once, right-click anywhere in the workspace and choose Expand All Scenes.
Moving slides between scenes:
You can move slides from one scene to another to better organize your content and change navigation. Just select one or more slides in a scene, then drag them to a different scene.
In Story View, lines and arrows indicate the relationship between slides and scenes. Use triggers to customize navigation and create branched scenarios. See the section called "Controlling the presentation order" later in this tutorial for details.
Working with Slides
Most of the work involved in building slides will be done in Slide View, but Story View is great for organizing slides, adjusting slide properties, and controlling navigation.
Adding slides:
To add a slide to your course in Story View, select the scene where you want it to appear, then do any of the following:
- Press Ctrl+M.
- Go to the Home tab and click New Slide.
- Go to the Insert tab and click New Slide.
- Right-click the scene and choose New Slide.
- Duplicate an existing slide by pressing Ctrl+D, going to the Home tab and clicking Duplicate, or right-clicking a slide and choosing Duplicate.
- Go to the Home tab and click Record Screen to insert a screencast.
To learn more about the different types of slides you can create, see Adding New Slides.
Renaming slides:
Titles appear below each slide. By default, each slide is either called Untitled Slide or uses the text from the title text box on the slide itself. You can change a slide title in Story View by doing either of the following (without changing the actual text on the slide):
- Double-click the title to open it for editing, type the new name, and press Enter on your keyboard.
- Right-click the slide and choose Rename. Type the new name and press Enter on your keyboard.
Storyline displays slide titles in your course menu. You can remove or rename slide titles in the menu without affecting the text on the slides or the slide titles in Story View. See this tutorial to learn more.
Rearranging slides:
To rearrange slides, just click and drag them to a new location. When you drag a slide, a small blue arrow will appear to show you where it'll be inserted. Release your mouse button to drop it into place.
You can also use Shift+Click and Ctrl+Click to select multiple slides at the same time to move them as a group. Slides can be rearranged within the same scene or moved to different scenes.
Editing slides:
For most slide-specific tasks, you'll switch to Slide View, but some edits can be made in Story View.
- Change the layout: Right-click any slide, scroll to Layout, and choose a layout. Or, go to the Home tab, click Layout, and choose a layout for the selected slide(s). (Learn more about slide masters and layouts.)
- Reset the layout: If you've modified elements of a slide that are inherited from its master layout, you can always revert back to the original layout. Right-click the slide and choose Reset Slide, or go to the Home tab and click Reset.
- Change the background: Right-click a slide and choose Format Background to add a different fill to the slide's background. Another option is to go to theDesign tab and click Background Styles, then right-click one of the styles to apply it to the selected slide or all slides. (Learn more about background designs.)
- Switch to a different design theme: Design themes are a quick way to change the background, colors, and fonts in your course. Go to the Design tab, right-click any theme, and apply it to the selected slide or all slides. (Learn more about themes.)
- Add a slide transition: Select a slide, go to the Transitions tab, and click any of the slide transitions. If the Effect Options button lights up, it means you can modify the slide transition by choosing an effect from the drop-down. (Learn more about slide transitions.)
- Add or edit triggers: Triggers tell Storyline how to respond when learners interact with your course. Select a slide and use the Triggers panel to add, edit, and delete triggers. (Learn more about triggers.)
- Adjust slide properties: Use the Slide Properties panel in the lower right corner to change how slides advance, how they behave when revisiting them, and which player controls they display. (Learn more about slide properties.)
- Duplicate, rename, or delete slides: Right-click any slide, then choose Duplicate,Rename, or Delete.
Controlling the Presentation Order
By default, scenes and slides follow a linear order, but you can add branching withtriggers. To branch from one scene to another, click the chain link icon at the bottom of the scene, then choose Link to Slide or Link to Scene.
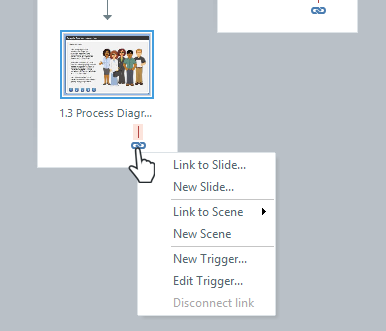
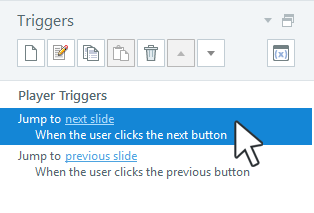
To branch from one slide to another, select the slide and double-click the Jump to next slide trigger in the Triggers panel. When the Trigger Wizard appears, select the slide to which you want to branch and click OK.
Managing Question Banks
Question banks are groups of questions from which you draw slides to create dynamic quizzes in your courses. A question draw can be a subset of questions or an entire bank, and it can even be randomized.
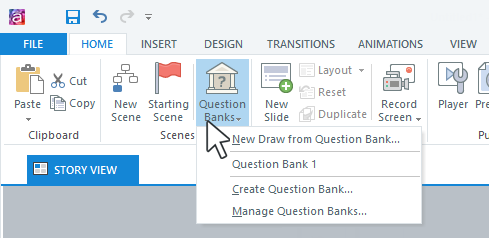
Question banks are managed in Story View. When you go to the Home tab and clickQuestion Banks, you'll see the following options:
- New Draw from Question Bank
- Create Question Bank
- Manage Question Banks
Existing question banks will also be listed. Every project has one question bank by default, called Question Bank 1, but you can add more.
For details about managing question banks and question draws, see this tutorial.
Tip: You don't have to use question banks to create quizzes. If you prefer, you can add question slides directly to your course just like content slides. See Adding Form-Based Questions and Adding Freeform Questions.
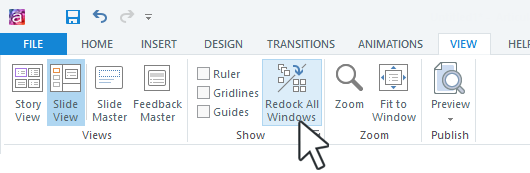
Undocking and Redocking Panels
Here's a helpful tip: You can undock panels and move them to another monitor if you need more room to work. Just click the title of a panel—such as Triggers orSlide Properties—and drag it to a new location.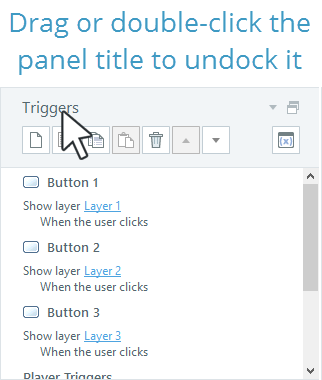
To redock a panel, click the Redock button in the panel's upper right corner.
To redock all panels at the same time, go to the View tab on the Storyline ribbon and click Redock All Windows.